Configuration
All customizations are applied in the src/index.ts file.
Here is all the available options:
| Name | Type(s) | Description | Examples |
|---|---|---|---|
readonly | boolean or undefined | Controls the write access globally, default: true | true |
cors | boolean or undefined | Enables or disables CORS access to the internal API, default: false | true |
cfAccessTeamName | string or undefined | When set enforces Cloudflare Access in all requests | radar (taken from https://radar.cloudflareaccess.com/) |
emailRouting | object or undefined | Customize Email Explorer, read more here | https://demo.r2explorer.com |
cacheAssets | boolean or undefined | Cache dashboard assets by 5 minutes, default: true | true |
buckets | object or undefined | Configure bucket-specific settings like public URLs | { BUCKET: { publicUrl: "https://cdn.example.com" } } |
emailRouting options:
| Name | Type(s) | Description | Examples |
|---|---|---|---|
targetBucket | string or undefined | Bucket name that will receive the emails | my-emails (assuming my-emails is a real bucket name) |
buckets options (per bucket):
| Name | Type(s) | Description | Examples |
|---|---|---|---|
publicUrl | string or undefined | Public URL prefix for the bucket's files | https://cdn.example.com |
Disabling readonly mode
For security reasons, by default your application will be in read only mode, to disable this, just update your src/index.ts file, like this:
import { R2Explorer } from 'r2-explorer';

export default R2Explorer({ readonly: false });
After this, just deploy your application normally with:
wrangler deployDANGER
Disabling read only mode, allows anyone to upload and change your bucket!
It is highly recommended to enable authentication in your application, read more here
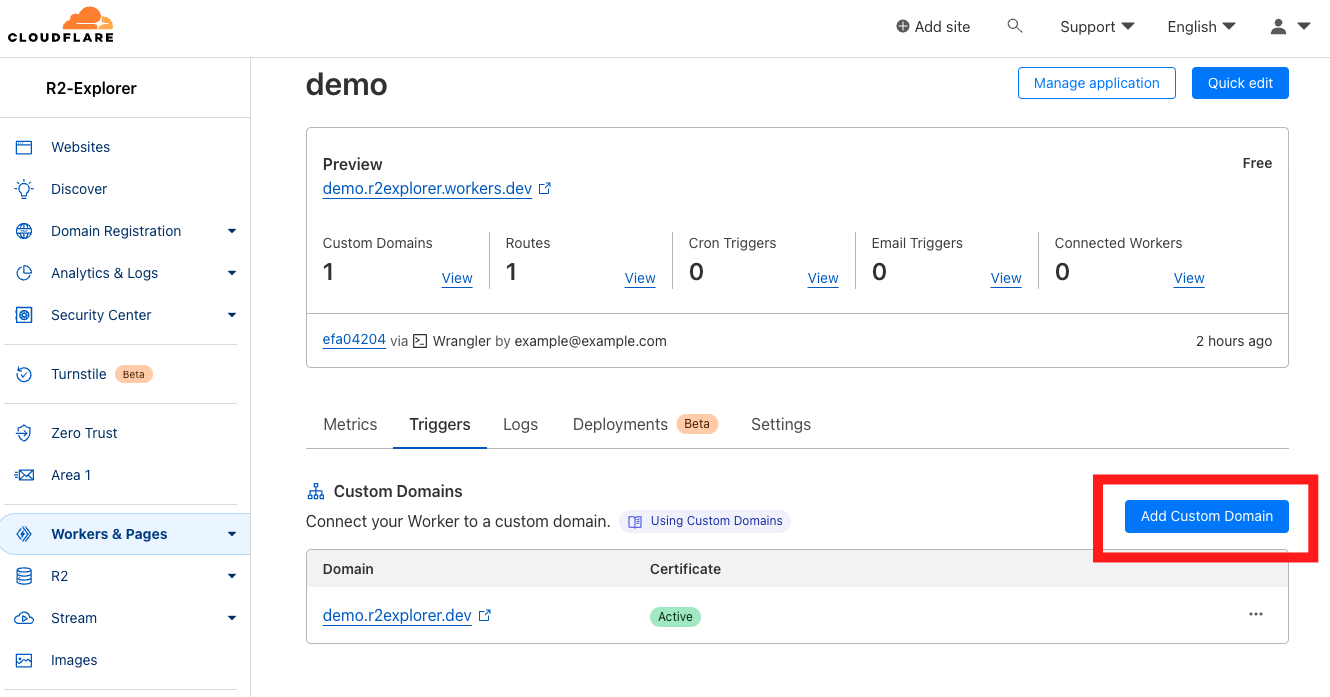
Setup Custom Domain
To setup a custom domain, just open the Cloudflare dashboard and go to Workers & Pages -> your worker -> Triggers. And click "Add Custom Domain".
Configuring Email Explorer target bucket
By default emails will go to the 1º bucket configured in your wrangler.toml file, but you can overwrite it in the index.ts file, like:
import { R2Explorer } from 'r2-explorer';

export default R2Explorer({
  readonly: false, emailRouting: {
    targetBucket: 'my-email-bucket'
  }
});
After this, just deploy your application normally with:
wrangler deployConfiguring Bucket Public URLs
If your R2 bucket is connected to a public domain (via Custom Domains or r2.dev), you can configure a public URL for it. This enables the "Copy Public URL" option in the file context menu, allowing you to quickly copy shareable links to your files.
import { R2Explorer } from 'r2-explorer';

export default R2Explorer({
  buckets: {
    'my-bucket': {
      publicUrl: 'https://cdn.example.com'
    }
  }
});
When configured, right-clicking a file in the specified bucket will show a "Copy Public URL" option that copies a URL like https://cdn.example.com/path/to/file.jpg to your clipboard.
TIP
The publicUrl should be the base URL without a trailing slash. The file path will be appended automatically.